Blog Categories in Word 2007

Many blog hosts support categories, including WordPress where this blog is hosted. Though many argue that in a Web 2.0 world, tags have superseded categories for classifying posts, that’s an argument for another day. Including a Categories entry for your sidebar gives your readers quick access to your collected wisdom on a topic. The question at hand then is, what kind of support does Word offer for the blogger?

Inserting a Category

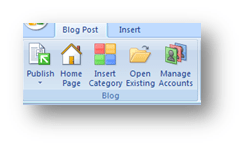
When you have set up your blog connection, the categories that you have already defined in WordPress will be recognized and made available to your post. On the Ribbon, your first group is the Blog group in which the Insert Category button lives. Clicking on this button will insert a drop-down box at the top of your post.


When you click on the drop-down, you can select one of your categories. Publishing your post will pass this data to WordPress and your entry will be appropriately classified. Want to include a post in more than one category? Click on the Insert Category button again and select another category.


Adding a New Category

The Category drop down box tempts you with the invitation to ‘type a new one’ to add a category to your WordPress list. Don’t be fooled. This function does not appear to work and each test that I did succeeded in pushing my post into the uncategorized category. The only workaround I have found right now is to go to the blog control center and add the category there. Update your entry and publish it. We’ll watch for a fix for this in the future.

A Word 2007 Shortcut for Blogging

One of things that make the blogging life easier is having simple, click-to-open access to your tools. Choosing Word 2007 as your client might not seem to be worth the effort on first glance. Right out of the box, creating a new post is a three step process.

  1. You’ll start Word which creates a default empty document.
  2. Then you’ll click the Office Button
  3. and then select Blog Post from the menu.


Seems like way too much work for me. Perhaps we ought to make a shortcut to simplify the whole process.

Creating a Word Blogging Shortcut

Word documents are based on templates that contain the formatting information for each type of document that you create and the blog post is no exception. Word supports command line switches so, with a little creative shortcutting we can override the Normal.dotx template with the Blog.dotx template and start the word processor in blog posting mode. Once you’ve located everything the process is a piece of cake. Watch.

  • The first thing you need to do is gather some information. You’ll need to identify the locations of the two files you are going to use, Winword.exe and Blog.dotx. Their default locations are:
    • Winword.exe F C:\Program Files\Microsoft Office\Office12\WINWORD.EXE
    • Blog.dotx F C:\Program Files\Microsoft Office\Templates\1033\Blog.dotx
  • Right click on the desktop and select New-Shortcut from the context menu. You’ll troubles will be rewarded with this:


  • You are going to use two of Word’s switches:
    • /q – starts Word without the splash screen
    • /t – starts Word with a specified template
  • In the data field, type the following line being sure to make any changes needed to accommodate your folder structure. The double quotes are necessary because of the spaces in the path. Also be sure to note that there is no space between the /t switch and the template name. Inserting a space there will open the template for editing and you don’t want to do that. At least not right now.
    • “C:\Program Files\Microsoft Office\Office12\WINWORD.EXE” /q /t”C:\Program Files\Microsoft Office\Templates\1033\Blog.dotx”


  • Click Next and you’ll be asked to name the shortcut. You’re a blogger, be creative.
  • Tada!


That should keep you occupied for today. Next, we’ll start checking out some of the features that Word brings to the game.

Blogging with Word 2007

Writers have a wide variety of choices when considering what tool to use in composing their blog posts. The internal editor of the blog software (e.g. WordPress, Blogger, etc.) is the simplest choice and it probably does the job for the majority of posts. When the writer wants to get a little more complex in their layout capabilities or have access to other editing tools, an external client is usually chosen. The editor must recognize the API of the writer’s blog host, but aside from that, most do a pretty good job in pretty much the same way. I’ve been using Windows LiveWriter for some time now and I am pleased with the results. It supports plug-ins, some nice image formatting, good text formatting tools, drafts with only one or two annoying proclivities (when it uploads an image to WordPress, it sends the image twice). Why consider Word as a blog client then? Two reasons; I like simplicity and if I can narrow my software installation down by using a multitasker then I’m happier and second, Microsoft has recognized the blogosphere big time and they have included new blogging features in Word and I want to see how well it will work.

Creating a New Post

Today we’ll examine Word’s capabilities by creating the post that you’re now reading. The blogging tools are enabled when you select New, and Blog. The template is set up with a title bar and a nice clean work area below. The new Ribbon interface that replaces the old menu and toolbar interface provides you with context specific tools as Word takes notice of what you are working on. For example, when the image was inserted, a new ribbon becomes visible with the image positioning and editing tools. When the focus shifts from the image, the ribbon vanishes keeping the interface clear. It takes some getting used to but in the end, it is going to prove to be a step forward in interface design.

Publishing
Your Entry

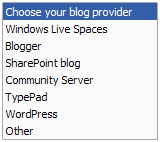
Setting up your blog host is a simple process as long as your host is a recognized provider (as shown in the choices at right) or it uses a known API. The step by step setup will ask all of the expected questions to create a publishing connection and you’re ready to go. Any categories that you have defined will be downloaded from your site and can be inserted into your post before publishing it. When the entry is ready, click on the Publish button and your post is sent to your blog for the world to admire.

We’ll look at the tool in greater detail in the days to come as I try more of the features but for now I’m satisfied but not overwhelmed. Are there any immediate features missing? As far as I can tell there is no way to insert tags but I may be simply missing the feature. Time will tell.